Port Forwarding in Context
Port forwarding is a technique that allows us to redirect a communication request from one port to another
- Uses TCP by default
- Different application layer protocols such as SSH or even SOCKS (non-application layer) can be used to encapsulate the forwarded traffic
SSH Local Port Forwarding
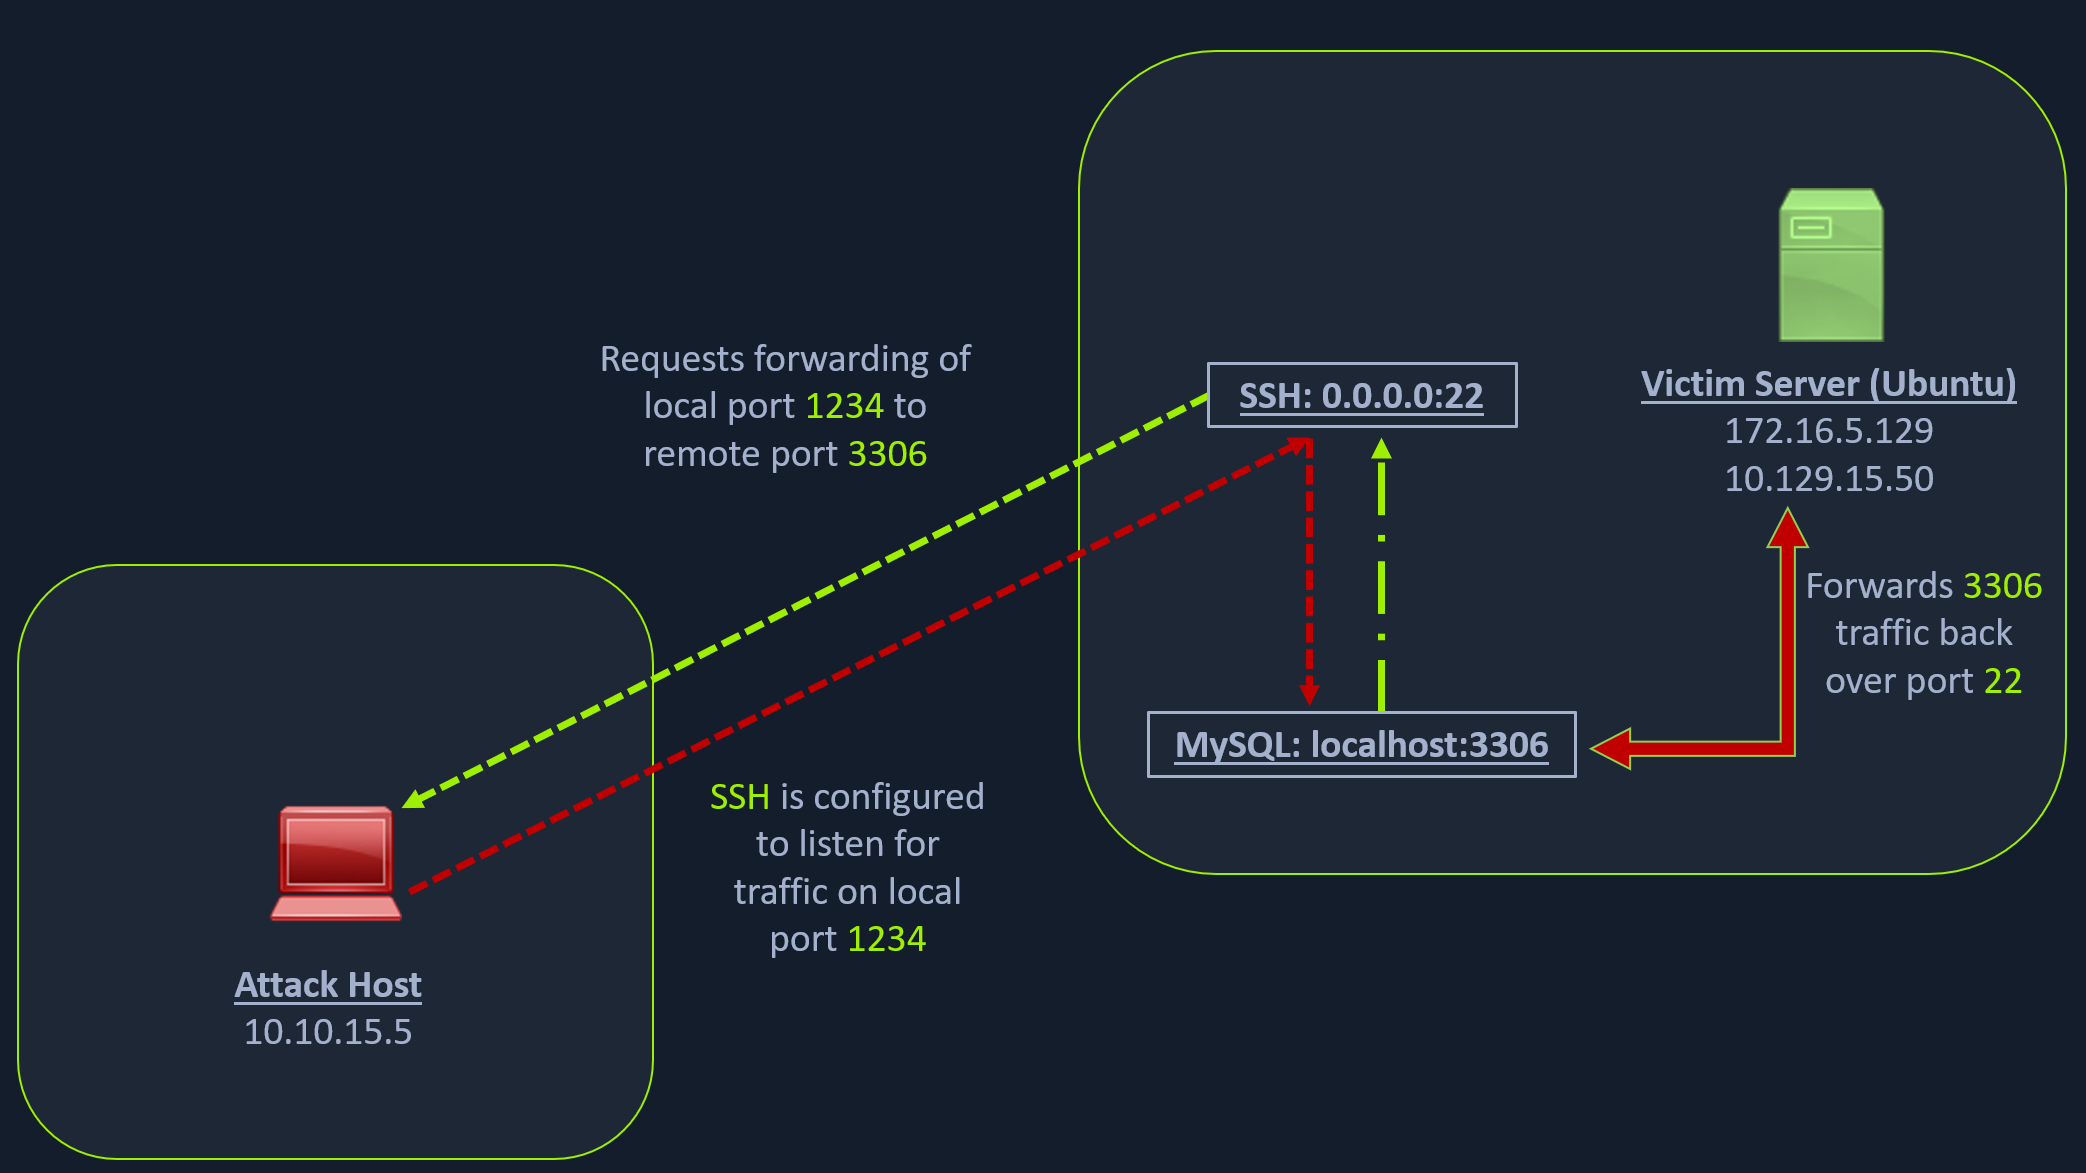
Let’s take an example from the below image.
Scanning the Pivot Target
nmap -sT -p22,3306 10.129.202.64To access the MySQL service, we can either SSH into the server and access MySQL from inside the Ubuntu server, or we can port forward it to our localhost on port 1234 and access it locally.
So, we will use the below command to forward our local port (1234) over SSH to the Ubuntu server.
Executing the Local Port Forward
Dynamic Port Forwarding with SSH and SOCKS Tunneling
ssh -L 1234:localhost:3306 ubuntu@10.129.202.64The -L command tells the SSH client to request the SSH server to forward all the data we send via the port 1234 to localhost:3306 on the Ubuntu server
By doing this, we should be able to access the MySQL service locally on port 1234. We can use Netstat or Nmap to query our local host on 1234 port to verify whether the MySQL service was forwarded.
Confirming Port Forward with Netstat
netstat -antp | grep 1234
tcp        0      0 127.0.0.1:1234          0.0.0.0:*               LISTEN      4034/ssh
tcp6       0      0 ::1:1234                :::*                    LISTEN      4034/ssh
Confirming Port Forward with Nmap
nmap -v -sV -p1234 localhostPORT STATE SERVICE VERSION
1234/tcp open mysql MySQL 8.0.28-0ubuntu0.20.04.3Similarly, if we want to forward multiple ports from the Ubuntu server to your localhost, you can do so by including the local port:server:port argument to your ssh command.
For example, the below command forwards the apache web server’s port 80 to your attack host’s local port on 8080.
Forwarding Multiple Ports
ssh -L 1234:localhost:3306 -L 8080:localhost:80 ubuntu@10.129.202.64Setting up to Pivot
Dynamic port forwarding and pivot our network packets via the Ubuntu server. We can do this by starting a SOCKS listener on our local host (personal attack host or Pwnbox) and then configure SSH to forward that traffic via SSH to the network (172.16.5.0/23) after connecting to the target host.
This is called SSH tunneling over SOCKS proxy.
SOCKS
SOCKS stands for Socket Secure, a protocol that helps communicate with servers where you have firewall restrictions in place. Unlike most cases where you would initiate a connection to connect to a service, in the case of SOCKS, the initial traffic is generated by a SOCKS client, which connects to the SOCKS server controlled by the user who wants to access a service on the client-side. Once the connection is established, network traffic can be routed through the SOCKS server on behalf of the connected client.
can pivot via creating a route to an external server from NAT networks
Let’s take an example of the below image where we have a NAT’d network of 172.16.5.0/23, which we cannot access directly.
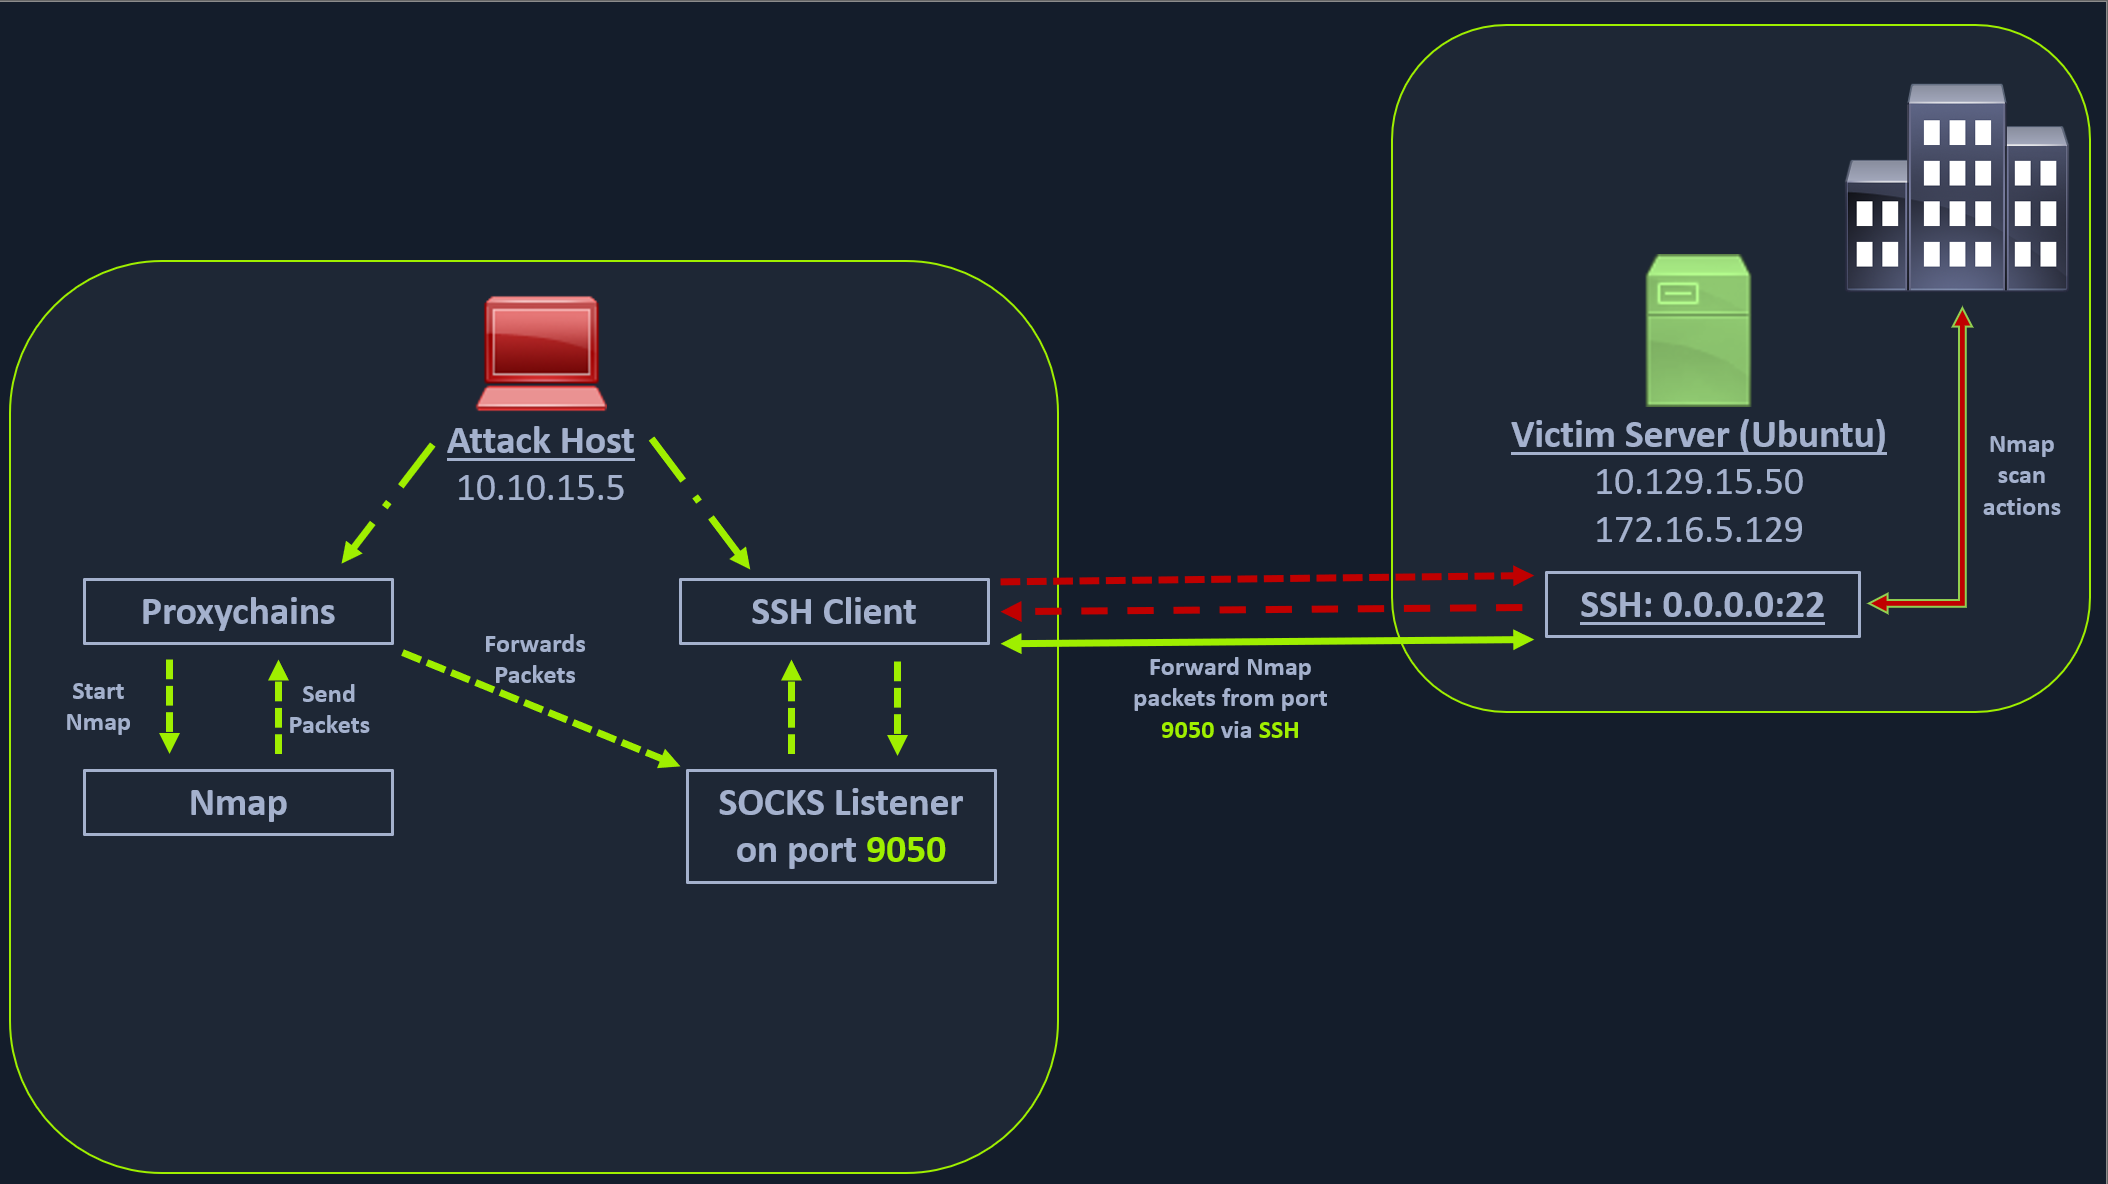
In the above image, the attack host starts the SSH client and requests the SSH server to allow it to send some TCP data over the ssh socket. The SSH server responds with an acknowledgment, and the SSH client then starts listening on localhost:9050
Whatever data you send here will be broadcasted to the entire network (172.16.5.0/23) over SSH
Enabling Dynamic Port Forwarding with SSH
ssh -D 9050 ubuntu@10.129.202.64-D argument requests the SSH server to enable dynamic port forwarding
a tool that can route any tool’s packets over the port 9050. We can do this using the tool proxychains, which is capable of redirecting TCP connections through TOR, SOCKS, and HTTP/HTTPS proxy servers and also allows us to chain multiple proxy servers together
Proxychains is often used to force an application’s TCP traffic to go through hosted proxies like SOCKS4/SOCKS5, TOR, or HTTP/HTTPS proxies.
Checking /etc/proxychains.conf
tail -4 /etc/proxychains.conf

# meanwile
# defaults set to "tor"
socks4 	127.0.0.1 9050
Using Nmap with Proxychains
proxychains nmap -v -sn 172.16.5.1-200This part of packing all your Nmap data using proxychains and forwarding it to a remote server is called SOCKS tunneling. We can only perform a full TCP connect scan over proxychains.
host-alive checks may not work against Windows targets because the Windows Defender firewall blocks ICMP requests (traditional pings) by default.
A full TCP connect scan without ping on an entire network range will take a long time.
Enumerating the Windows Target through Proxychains
proxychains nmap -v -Pn -sT 172.16.5.19Using Metasploit with Proxychains
proxychains msfconsoleUsing rdp_scanner Module
search rdp_scanneruse 0set rhosts 172.16.5.19runUsing xfreerdp with Proxychains
proxychains xfreerdp /v:172.16.5.19 /u:victor /p:pass@123vfrank: Imply wet Unmasked!